MisFydKrafts Badges are Available for Grabs

Today I was busy designing for MisFydKrafts Badges & learn how to post it so that ppl can grab them. It’s been quite some time that I was thinking to make them & of course it took me awhile to learn how to play around with the HTML codes (still learning). With the high tech knowledge library of the ‘internet’, some very generous ppl out there that shares their knowledge & a bit of hard work, I have successfully post them myself :).

You can grab one of my badge here, or click at the badge above.

~~~~~~~~~~~~~~~~~~~~~~~~~~~~~~~~~~~~~~~~~~~~~~~~~~~~~~~~~~~~~~~~~~~~~~~~~~~~~~~~~~~~~~~~~~
How to add your own ‘Grab my badge or link me’ button 

Maybe a lot of you all out there are thinking of making your own badge/button for your blog, don’t know how to start, will spent a lot of time figuring how to make them like me.

To make your work easier, without thinking so much of the HTML codes, here’s a simple step by step on how you can add your own ‘Grab my badge or link to me’ button for your blog:

1)
First, you have to create a badge size around 125×125 pixel.
Of course you can create bigger one but make sure it can fit in most sidebars in blogs. For me, I’ve created a few sizes so that everyone can choose. You can use any photo editing software such as photoshop or GIMP, logo making software such as AAA Logo to design your badge. For me, I’ve used AAA Logo & GIMP to design & edit my badges.

2)
After you had create your badge, upload the badge in a photo hosting account such as photobucket, flickr etc. You can get the badge URL there. For example, you can click at the badge below:

The URL address will be something like this:

3)
Next, to add it in your sidebar (for blogger),
go to–> layout > page element > add gadget > HTML/Javascript

4) 
Then copy & paste the code below replacing your information in red text:

*****************************************************************************************************

<a href="http://yourblogaddress.com/” target=”_blank”>
<img src="http://yourphotowebaddress.com/yourphoto.jpg” border=”0″ />

<a target="_blank" href="http://yourblogaddress.com/“><img border="0" src="http://yourphotowebaddress.com/yourphoto.jpg” border=”0″ />

******************************************************************************************************

5)
Finally, just save & try it. 🙂

I hope this will help & simple enough to understand.
Good luck! If you have any problem feel free to ask me.
Although I’m also new in this thing, I’ll try my best to help.


New Accessories! – The Crochet Ring

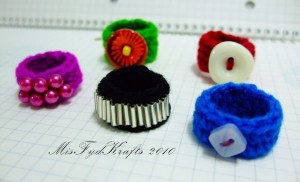
One of my to do list was crochet ring. Thursday night, I was crazy designing the crochet ring. I managed to finished 5 different colours & designs of crochet ring. Yes, 5 different rings in one night! How crazy I’m if I have something in mind. I just can’t stop making :p.
Here’s my new creations:

First stage. Finished the crochet ring. Tried in on on all my fingers :p.   
Simply & it looks nice just like that. Of course I didn’t stop right there. 
I Accessorise them!!
Final stage. Finished accessorised all the rings with beads/buttons :). 
Tried them again on all my fingers. How do they look? 
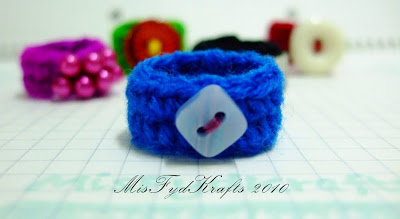
I was so excited looking at them until I can’t stop taking photos so here’s some close up on all the rings:
 
Black base with silver bugles beads.


Blue base with pearly blue square button.


Green base with orange flower motif button.


Purple base with shocking pink round beads.


Maroon base with triangle white button.

Sold to Shida as her tudung ring -Thanks!

So which one do you like? 🙂

Crochet Style Bracelet – Blue + Grey + Hook

Last week I managed to learn several new type of stitches from The Crochet Side’s YouTube tuts. One of it was the Wattle stitch which combines ch, sc & dc stitches.
I made a new design bracelet using the stitch. A blue base with grey edging. In addition, I took out my pliers & finish it with my extra metal accessories rings & hook (left over from Japan stash) to fasten the bracelet.  
Here’s the new bracelet with the new stitch:

 Kinda love the texture of the stitch. That’s why I just made it a plain design. 

Another new design from me 🙂

Crochet Style Bracelet – Light Yellow + Light Brown + Beads

I designed a new bracelet on Tuesday as Aishah asked whether I have a yellow one for one of her friend. So I just tried to make one with my only yellow yarn available. Crochet the bracelet with a yellow yarn using beading method (bead the yarn before crochet). Used the normal sc stitch with light brown yarn for the edging & a metal button for fasten. It’s a sweeter version compare my previous design as the yarn are less thicker.
So here’s the new bracelet:

I just love creating new stuff! 🙂 What do you think about this design?

Sold to Aishah. Hope Aishah’s friend will like it. Thanks!